
들어가며
이제 파이프 연결 퍼즐 게임의 주요 로직은 다 만들었다고 할 수 있다. 그러면 파이프 생성과 제거, 그리고 약간의 버그를 고치면서 마무리를 해보도록 하겠다.
파이프 생성 전 세팅과 버그 픽스
먼저, 생각해놓은 파이프 종류들을 구현을 하도록 하겠다.
다시 적어보면 파이프의 총 종류는 4가지로 각각 일자형, ㄱ자형, 십자형, T자형 파이프의 종류를 생각했었다.
이 파이프들을 유니티의 기본 도형만으로 구현을 해보았다.


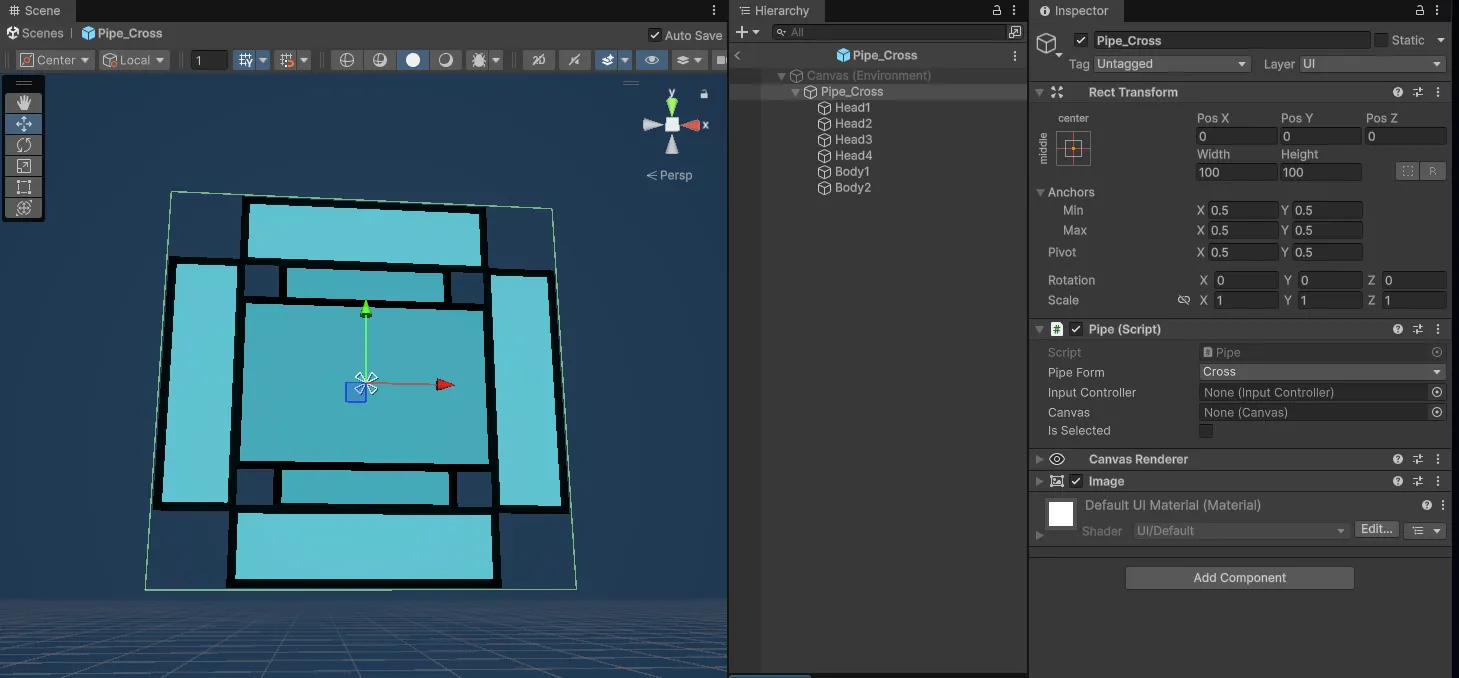

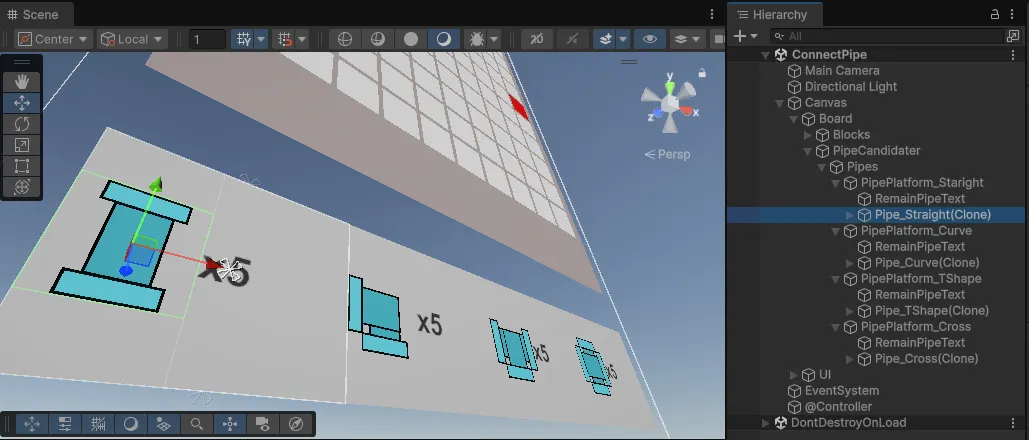
이렇게 총 4가지의 파이프 종류를 만들고 프리팹으로 만들었다. 이 파이프들이 생성되고 드래그 드롭을 대기하는 오브젝트를 만들고, 그곳에서 대기 중인 파이프들을 드래그하여 배치하면 원래 위치에 파이프가 생성되는 형태의 파이프 생성 로직을 생각했다.

파이프의 프리팹 옆에는 텍스트로 현재 파이프가 몇개 남아있는지 표시해주고, 남은 파이프의 개수가 0개라면 드래그 드롭이 비활성화되게끔 만들어보겠다.
그런데, 해당 기능을 구현하기 전에 이전에 만들었던 드래그 드롭에서 버그가 생겼기 때문에 해당 버그를 먼저 고치고 진행하겠다.
현재 발견된 버그는 파이프의 드래그 드롭을 할 때, 블록의 OnDrop이 호출되기 전에 파이프의 OnEndDrag가 먼저 호출되면서 로직이 꼬이게 된다.
이 때문에 파이프가 캔버스와 동일한 위계선상으로 부모가 지정되어 사라지는 것처럼 보이는 문제가 발생했다.
이 문제를 고치기 위해서는 드래그 드롭이 실패 했을 때, 부모가 엉뚱한 곳으로 지정이 되지 않게끔 OnEndDrag와 OnDrop의 순서를 재정렬할 필요가 있다.
해당 부분을 수정한 코드는 다음과 같다.
Pipe.cs
        private bool dropped = false;
        public void SetDropped(bool value) => dropped = value;

        public void OnEndDrag(PointerEventData eventData)
        {
            //드롭이 실패했다면
            if (!dropped)
            {
                transform.SetParent(originParent);           //원래 부모로 돌아가기
                rectTrs.anchoredPosition = originAnchoredPos;//원래 위치로 돌아가기
            }

            for (int i = 0; i < transform.childCount+1; i++)
            {
                image[i].raycastTarget = true; //반면, 드래그가 끝나면 다시 클릭이 되게 raycaseTarget을 켜줌
                if(i != 0)
                    image[i].color = new Color(image[i].color.r, image[i].color.g, image[i].color.b, 1f);
                if (i != transform.childCount)
                    outline[i].effectColor = new Color(outline[i].effectColor.r, outline[i].effectColor.g, outline[i].effectColor.b, 1f);
            }
        }
Pipe 클래스에 드롭이 되었는지를 확인할 boolean 변수를 추가하고, SetDropped 함수를 추가 해주었다. 그리고 드롭이 실패하면(if문의 조건문인 !dropped) 드래그가 시작할 때(OnBeginDrag), 담아두었던 원래 부모(originParent)와 원래 위치(oringinAnchoredPos)로 다시 돌아가는 코드를 추가했다.
Block.cs
        public void SetPipe(Pipe arg)
        {
            pipe = arg;

            RectTransform blockRect = GetComponent<RectTransform>();
            RectTransform pipeRect = pipe.GetComponent<RectTransform>();

            pipeRect.SetParent(transform);

            pipeRect.anchoredPosition = Vector2.zero;
            pipeRect.localScale = Vector2.one;

            SetState(BlockState.Fill);
            pipe.SetDropped(true);
        }
Pipe가 드롭에 성공했다면, SetPipe가 실행이 될 것이다. 그러니 파이프가 드롭에 성공했다면 dropped를 SetPipe에서 처리하도록 만들었다. 이런 식으로 만들면 EventSystem의 순서와 맞물리면서 기존에 가지고 있던 문제가 사라진다.
파이프 생성

이제 위의 모습대로 파이프들이 대기하는 장소인 PipeCandidater를 만들어 볼 것이다. 코드는 다음과 같다.
PipeCandidater.cs
using System.Collections.Generic;
using Unity.VisualScripting;
using UnityEngine;
using UnityEngine.UI;
namespace ConnectPipe
{
    public class PipeCandidater : MonoBehaviour
    {
        [Header("Texts")]
        [SerializeField] Text straightPipeText;
        [SerializeField] Text curvePipeText;
        [SerializeField] Text tShapePIpeText;
        [SerializeField] Text crossPipeText;

        Dictionary<PipeForm,Text> pipeCountTexts = new Dictionary<PipeForm,Text>();

        [Header("Transforms")]
        [SerializeField] Transform straightPlatform;
        [SerializeField] Transform curvePlatfomr;
        [SerializeField] Transform tShapePlatform;
        [SerializeField] Transform crossPlatform;

        Dictionary<PipeForm,Transform> pipePlatforms = new Dictionary<PipeForm,Transform>();

        [Header("Prefabs")]
        [SerializeField] GameObject straight;
        [SerializeField] GameObject curve;
        [SerializeField] GameObject t_Shape;
        [SerializeField] GameObject cross;
        Dictionary<PipeForm,GameObject> pipePrefabs = new Dictionary<PipeForm,GameObject>();

        [SerializeField]
        Vector2 pipePosOffset = new Vector2(-75, 0); //파이프 위치 오프셋

        private void Start()
        {
            pipeCountTexts.Add(PipeForm.Straight, straightPipeText);
            pipeCountTexts.Add(PipeForm.Curve, curvePipeText);
            pipeCountTexts.Add(PipeForm.T_Shape, tShapePIpeText);
            pipeCountTexts.Add(PipeForm.Cross, crossPipeText);

            pipePlatforms.Add(PipeForm.Straight, straightPlatform);
            pipePlatforms.Add(PipeForm.Curve, curvePlatfomr);
            pipePlatforms.Add(PipeForm.T_Shape, tShapePlatform);
            pipePlatforms.Add(PipeForm.Cross, crossPlatform);

            pipePrefabs.Add(PipeForm.Straight, straight);
            pipePrefabs.Add(PipeForm.Curve, curve);
            pipePrefabs.Add(PipeForm.T_Shape, t_Shape);
            pipePrefabs.Add(PipeForm.Cross, cross);
        }

        public void Init(Dictionary<PipeForm, int> remainPipe)
        {
            for(int i = 0; i < remainPipe.Count; i++)
            {
                pipeCountTexts[(PipeForm)i].text =  "x" + remainPipe[PipeForm.Straight];
            }

            for(int i = 0; i < pipePlatforms.Count; i++)
            {
                RectTransform newPipeRect = Instantiate(pipePrefabs[(PipeForm)i], pipePlatforms[(PipeForm)i]).GetComponent<RectTransform>();
                newPipeRect.anchoredPosition = pipePosOffset;

                Pipe currentPipe = newPipeRect.GetComponent<Pipe>();
                currentPipe.InitPipe((PipeForm)i); //파이프 필드 초기화
            }
        }

        public void PipeSucsessedPlace(PipeForm form, int remainCount)
        {
            pipeCountTexts[form].text = "x" + remainCount;

            RectTransform newPipeRect = Instantiate(pipePrefabs[form] , pipePlatforms[form]).GetComponent<RectTransform>();
            newPipeRect .anchoredPosition = pipePosOffset;
            Pipe currentPipe = newPipeRect.GetComponent<Pipe>();
            currentPipe.InitPipe(form); //파이프 필드 초기화
        }
    }
}
원래는 인스펙터에서 딕셔너리로 바로 드래그 드롭으로 넣으려고 했지만, 그러려면 직렬화 과정을 거쳐야하기에 위 코드처럼 처리를 해주었다.
만약, 이후에 좀 더 업그레이드를 해서 실제 게임처럼 만들려면 Load 함수와 Find 함수 등으로 직접 딕셔너리에 Add 함수를 통해서 집어 넣으면 된다.
그러니 이후 코드에서는 딕셔너리로 관리를 하도록 하겠다.
또한, 이제 파이프 생성을 해주고 초기화를 해주는 오브젝트에 생겼으니, 기존에 테스트로 만들었던 Pipe 클래스의 Start 함수를 주석 처리를 해주도록 하겠다.
Pipe.cs
        ////테스트용 Start
        //private void Start()
        //{
        //    InitPipe(PipeForm.Straight);
        //}

        //파이프의 필드 초기화
        public void InitPipe(PipeForm argForm)
        {
            rectTrs = GetComponent<RectTransform>();

            inputController = GameObject.Find("@Controller").GetComponent<InputController>();
            canvas = GameObject.Find("Canvas").GetComponent<Canvas>();
            pipeForm = argForm;

            CurrRotation = Direction.Up; //회전 상태를 0으로 초기화

            outline = new Outline[transform.childCount];
            outline = GetComponentsInChildren<Outline>();

            image = new Image[transform.childCount];
            image = GetComponentsInChildren<Image>();

        }
PuzzleController.cs
using System;
using System.Collections.Generic;
using Unity.VisualScripting;
using UnityEngine;

namespace ConnectPipe
{
    public class PuzzleController : MonoBehaviour
    {
        [SerializeField]
        private PuzzleGenerater generater;

        [SerializeField]
        private PipeCandidater pipeCandidater;

        private int rows = 10; //y, 행
        private int cols = 10; //x, 열

        Block[,] blocks;
        Block startBlock;

        [SerializeField]
        private Dictionary<PipeForm, int> remainPipe; //남아있는 파이프 수

        //방향별 좌표 이동량
        private static readonly Vector2Int[] dirOffset =
        {
            new Vector2Int(0, 1),   // Up = 0
            new Vector2Int(1, 0),   // Right = 1
            new Vector2Int(0, -1),  // Down = 2
            new Vector2Int(-1, 0)   // Left = 3
        };


        private void Start()
        {
            GameStart();
        }

        public void GameStart()
        {
            blocks = generater.GenerateBlock(rows, cols);

            //임시로 랜덤으로 시작점과 도착점 정하기
            int startPosX = UnityEngine.Random.Range(0, cols);
            int startPosY = UnityEngine.Random.Range(0, rows);
            int endPosX = UnityEngine.Random.Range(0, cols);
            int endPosY = UnityEngine.Random.Range(0, rows);
            //랜덤으로 나와서 겹치는 경우가 있을 수도 있음
            //어차피 계획으로는 레벨 에디터를 만들어서 레벨을 만들고, 그걸 스크립터블오브젝트든 뭐든 데이터로 스테이지로 만들 계획임

            SelectStartEndBlock(new Vector2Int(startPosX,startPosY) , new Vector2Int(endPosX, endPosY));

            //파이프 지급
            InitPipeCount(5);
        }
        void InitPipeCount(int pipeCount)
        {
            //스테이지마다 필요한 파이프 개수가 다를 수도 있지
            remainPipe = new Dictionary<PipeForm, int>();
            for(int i = 0; i < Enum.GetNames(typeof(PipeForm)).Length; i++)
            {
                remainPipe.Add((PipeForm)i, pipeCount);
            }

            pipeCandidater.InitText(remainPipe);
        }
        //혹시 모르니 getter와 setter 미리 만들어두기
        public int GetPipeCount(PipeForm form)
        {
            return remainPipe[form];
        }
        public void SetPipeCount(PipeForm form, int value)
        {
            remainPipe[form] = value;
        }
        //아직 사용안한 함수
        public void PipeSucsessedPlace(PipeForm form)
        {
            remainPipe[form] -= 1;
            //0개 고정
            if (remainPipe[form] <= 0)
            {
                remainPipe[form] = 0;
            }

            pipeCandidater.PipeSucsessedPlace(form, remainPipe[form]);
        }

        //이하 생략...
PuzzleController에서는 관련된 처리를 할 변수들과 함수들을 만들어줬다. 남아있는 파이프 갯수를 저장할 딕셔너리를 선언해주었는데, 이 때 키값은 enum인 PipeForm으로 만들어서 파이프 갯수를 분류하여 관리하겠다.
게임이 시작되면 파이프 갯수를 초기화하는 함수인 InitPipeCount 함수
PipeCount 딕셔너리를 가져오는 GetPipeCount 함수
PipeCount 딕셔너리의 값을 변경할 수 있는 SetPipeCount 함수
아직 사용하진 않은 PipeSucsessedPlace 함수까지 총 4가지 함수를 추가해주었다.
파이프 배치 전 처리
여기까지 만들었다면, 다음은 파이프를 배치를 배치하기 전과 후에 해야할 처리들이 있다. 먼저 배치 전에 이루어져야할 처리들을 구현해보겠다.
우선, 파이프가 성공적으로 배치가 된다면 남은 개수가 줄어들 것이고, 개수가 0이면 파이프 프리팹이 생성은 되지만 드래그 드롭은 불가능하게 만들 것이다.
그렇다면 어떻게 구현할 것인가?
떠오르는 방법은 두 가지가 있다.
- 화면의 파이프 개수를 추적
- PuzzleController가 개수를 데이터로 관리(Dictionary)
첫 번째 방법은 말 그대로 화면의 파이프 개수를 추적하는 방법이다.
만약에 현재 화면에 해당 종류의 파이프 오브젝트가 1개만 있다면, 대기 자리에 하나 있는 파이프만 존재한다는 뜻이다.
(remainPipe - 0 = 남아있는 파이프 개수)
현재 화면에 해당 종류의 파이프 오브젝트가 4개 있다면, 대기 자리에 있는 파이프를 제외하고 3개의 파이프를 사용했다는 뜻이다.
(remainPipe - 3 = 남아있는 파이프 개수)
현재 화면에 해당 종류의 파이프가 6개 있다면, 대기 자리에 있는 파이프를 제외하고 5개의 파이프를 사용했다는 뜻이다.
(remainPipe - 5)
즉, 화면에 존재하는 해당 종류의 파이프 수 == 사용한 파이프 개수 +1 (대기 자리에 있는 파이프) 라는 뜻이다.
하지만 이 방법을 택하려면 움직이지 않는 파이프는 대기 자리에 있는 파이프여야만하기에 대기 중인 파이프를 식별하기 위한 로직이 필요하다.
또 다른 이유라면, 화면에 존재하는 파이프를 추적하는 방법이 필요할 것이다.
이렇듯 고려사항이 더 많은 관계로 일단, 두 번째인 PuzzleController가 남은 갯수를 직접 관리하는 방법을 택했다.
파이프가 한 번이라도 배치된 적이 있다면 true를 반환하는 boolean 변수인 isBeforePlace를 선언하고, 드래그가 시작되는 함수인 OnDrag 함수에 if문으로 이 파이프가 드래그 되어도 되는 파이프인지 조건을 확인한다.
Pipe.cs
public void OnDrag(PointerEventData eventData)
{
    //배치된 적 없는 파이프가 해당 종류의 파이프가 남은 개수가 0 이하일때, 드래그가 실행되지 않음
    if (!isBeforePlace && puzzleController.GetPipeCount(pipeForm) <= 0) return;
    rectTrs.anchoredPosition += eventData.delta / canvas.scaleFactor;
}
저 if문이 길고 가독성이 떨어진다고 생각하여 함수로 묶어서 boolean을 반환하는 함수인 CanDrag를 만들어 주었다.
public bool CanDrag()
{
    return !(!IsBeforePlaced() && puzzleController.GetPipeCount(pipeForm) <= 0);
}
이제 이 함수들을 실제로 적용되어야 하는 곳들에 적용을 해주었다.
CanDrag를 호출해야 하는 부분들과 코드는 다음과 같다.
- Pipe 클래스의 OnDrag 관련 함수들
- Block 클래스의 OnDrop 함수
Pipe.cs
public void OnBeginDrag(PointerEventData eventData)
{
    if (!CanDrag()) return;

    //이전 부모가 블록일 경우
    if (transform.parent.GetComponent<Block>() != null)
    {
        originParent = transform.parent;
        originAnchoredPos = rectTrs.anchoredPosition;
    }
    //드래그할 때 항상 앞에 보이도록 캔버스를 부모로 지정(자동으로 가장 마지막 SiblingIndex를 받게됨)
    transform.SetParent(canvas.transform);

    //드래그 중이라면 약간 투명해지는 연출
    for (int i = 0; i < transform.childCount+1; i++)
    {
        //파이프 이미지에 의해 막혀서 드롭 이벤트가 호출이 안되는 문제가 발생
        image[i].raycastTarget = false; //그래서 드래그 도중에는 raycastTarget을 꺼서 드롭이벤트가 잘 작동하도록 함

        if(i != 0) //0번째 이미지 컴포넌트는 본체를 말함
                   //본체는 이벤트를 위해 추가한 것으로, 실제로는 색상이 변경되면 안되니 조건문을 추가
        {
            image[i].color = new Color(image[i].color.r, image[i].color.g, image[i].color.b, 0.4f);
        }

        //본체는 outline 컴포넌트가 없어서, 두 배열의 길이가 다름
        if (i != transform.childCount) //그래서 마지막 i는 outline 배열 범위에 벗어나는 값이니 건너뛰기 위해서 조건문 추가
            outline[i].effectColor = new Color(outline[i].effectColor.r, outline[i].effectColor.g, outline[i].effectColor.b, 0.0f);
    }

}

public void OnDrag(PointerEventData eventData)
{
    if (!CanDrag()) return;
    rectTrs.anchoredPosition += eventData.delta / canvas.scaleFactor;
}

public void OnEndDrag(PointerEventData eventData)
{
    if (!CanDrag()) return;
    //드롭이 실패했다면
    if (!dropped)
    {
        transform.SetParent(originParent);           //원래 부모로 돌아가기
        rectTrs.anchoredPosition = originAnchoredPos;//원래 위치로 돌아가기
    }

    for (int i = 0; i < transform.childCount+1; i++)
    {
        image[i].raycastTarget = true; //반면, 드래그가 끝나면 다시 클릭이 되게 raycaseTarget을 켜줌
        if(i != 0)
            image[i].color = new Color(image[i].color.r, image[i].color.g, image[i].color.b, 1f);
        if (i != transform.childCount)
            outline[i].effectColor = new Color(outline[i].effectColor.r, outline[i].effectColor.g, outline[i].effectColor.b, 1f);
    }
}
Block.cs
public void OnDrop(PointerEventData eventData)
{
    if (state != BlockState.Empty) return; //파이프는 비어있는 블록에만 배치 가능

    Debug.Log($"OnDrop :: {gameObject.name}");

    if (eventData.pointerDrag != null)
    {
        Pipe droppedPipe = eventData.pointerDrag.GetComponent<Pipe>();
        if (droppedPipe == null) return;
        if (!droppedPipe.CanDrag()) return;

        //새로 배치할 경우 이전의 블록에서 pipe를 제거
        Block oldBlock = droppedPipe.GetComponentInParent<Block>();
        if(oldBlock != null && oldBlock != this)
        {
            oldBlock.RemovePipe();
        }

        SetPipe(droppedPipe);
    }
}
파이프가 드래그가 시작되면 CanDrag 함수를 통해 드래그 가능 여부를 확인하고, 조건에 맞지 않다면(CanDrag 함수가 false를 반환한다면) 드래그 관련 함수들이 실행되지 않게 만들었다.
드래그가 처리되지 않는 조건은 배치가 한 번도 되지 않은 파이프가 남은 개수(PuzzleController의 remainPipe)도 0개라면 드래그가 되지 않는다.
여기까지가 파이프 배치 전에 이루어져야 할 처리인, 드래그 드롭 여부 확인을 했다. 다음은 파이프가 배치된 후의 처리이다.
파이프 배치 후 처리
이제 파이프의 배치가 성공적으로 이루어졌다면, 해당 파이프의 isBeforePlace와 갯수 처리가 이루어져야 한다. 배치 전 처리에서 isBeforePlace의 선언부를 보여주지 않았던 것도 처리를 해야하는 부분이 지금 파트이기 때문이다.
우선, isBeforePlace의 Getter와 Setter를 만들어 주었다.
Pipe.cs
public void SetPlacedInfo(bool value) => isBeforePlace = value;
public bool IsBeforePlaced() => isBeforePlace;
그 다음에는 Block 클래스의 SetPipe 함수에서 파이프의 배치가 이루어졌다면 isBeforePlace를 true로 바꿔주고, PuzzleController의 갯수 처리를 해주도록한다. 이때 함수는 아까 만들어 놓기만 했던 PipeSucsessedPlace(Pipeform form)를 사용한다.
Block.cs
public void SetPipe(Pipe arg)
{
    pipe = arg;

    RectTransform blockRect = GetComponent<RectTransform>();
    RectTransform pipeRect = pipe.GetComponent<RectTransform>();

    pipeRect.SetParent(transform);

    pipeRect.anchoredPosition = Vector2.zero;
    pipeRect.localScale = Vector2.one;

    SetState(BlockState.Fill);
    pipe.SetDropped(true);
    pipe.SetPlacedInfo(true); //파이프의 배치가 이루어졌으니 isBeforePlace를 활성화
    controller.PipeSucsessedPlace(pipe.GetForm()); //개수 처리도 같이 해줌
}
드래그 드롭 로직 오류
포스팅 초반에 고친 오류와는 별개로 이전에 드래그 중에 파이프의 렌더링 순서 때문에 임시로 드래그 도중에는 부모를 캔버스로 지정한 처리가 있는데, 이것 때문에 오류가 났다.
이렇게 처리를 하니, Block 클래스의 RemovePipe 함수가 제대로 작동하지 않는 것이다.
RemovePipe 함수는 파이프가 블록에서 블록으로 드래그 드롭하여 배치했을 때 호출이 되는 함수로 블록이 배치되는 파이프의 현재 부모가 Block 스크립트(컴포넌트)가 있다면, 그 블록의 RemovePipe를 호출한 다음 자신의 자식으로 파이프를 넣는 SetPipe 함수가 호출이되는 식으로 만들었는데, 그 조건이 "파이프의 현재의 부모가 블록이라면"이라 문제가 된 것이다.
        public void OnDrop(PointerEventData eventData)
        {
            if (state != BlockState.Empty) return; //파이프는 비어있는 블록에만 배치 가능

            Debug.Log($"OnDrop :: {gameObject.name}");

            if (eventData.pointerDrag != null)
            {
                Pipe droppedPipe = eventData.pointerDrag.GetComponent<Pipe>();
                if (droppedPipe == null) return;
                if (!droppedPipe.CanDrag()) return;

                //새로 배치할 경우 이전의 블록에서 pipe를 제거
                Block oldBlock = droppedPipe.GetComponentInParent<Block>();
                if(oldBlock != null && oldBlock != this)
                {
                    oldBlock.RemovePipe();
                }

                SetPipe(droppedPipe);
            }
        }
        //파이프를 비우는 함수
        public void RemovePipe()
        {
            Debug.Log($"RemovePipe(Block : ({position.x},{position.y}))");
            if (pipe != null)
            {
                pipe = null;
                SetState(BlockState.Empty);
            }
        }
하지만, 이전에 잠시 문제를 해결하기 위해 했던 "드래그 중에는 부모를 캔버스로 지정"하는 처리에 의해 옮긴 블록은 파이프의 이전 블록을 인지하지 못하고, 이전 블록의 RemovePipe를 호출하지 못하니 이전 블록과 새로 옮긴 블록이 같은 파이프를 가지고 있다고 착각하는 문제가 발생했다.
이렇게 되면 둘 다 블록의 상태가 Fill이기 때문에 새로운 파이프가 배치가 안되니 문제가 된다. 그래서 찾은 해결법은 다음과 같다.
- 파이프는 블록과 블록끼리만 이동한다. (파이프의 부모는 드래그를 제외한 모든 경우에 블록이다.)
- PipeCandidater에 배치 전에 가지고 있을 블록을 추가한다.(대기 장소를 위한 블록을 추가한다.)
- oldBlock을 부모로 찾지 말고, Pipe의 orginParent로 처리를 한다.
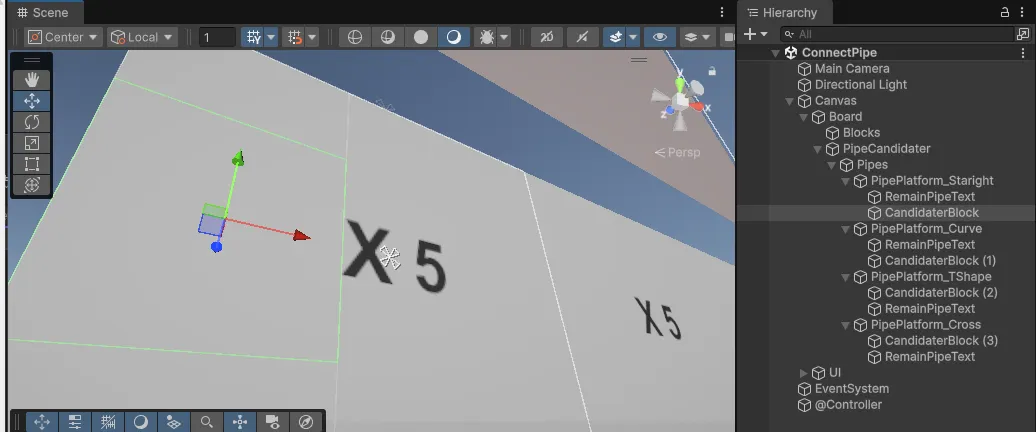
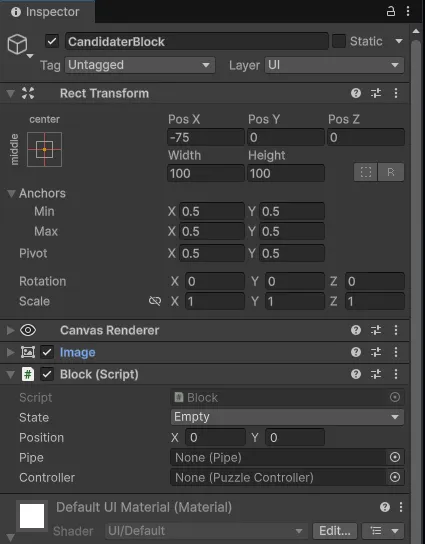

이제 파이프들은 CandidaterBlock의 자식으로 생성될 것이다. 그러니, PipeCandidater의 파이프 위치를 잡아주는 코드는 필요가 없어졌으므로 수정을 해준다.
using System.Collections.Generic;
using Unity.VisualScripting;
using UnityEngine;
using UnityEngine.UI;
namespace ConnectPipe
{
    public class PipeCandidater : MonoBehaviour
    {
        [Header("Texts")]
        [SerializeField] Text straightPipeText;
        [SerializeField] Text curvePipeText;
        [SerializeField] Text tShapePIpeText;
        [SerializeField] Text crossPipeText;

        Dictionary<PipeForm,Text> pipeCountTexts = new Dictionary<PipeForm,Text>();

        [Header("Transforms")]
        [SerializeField] Transform straightPlatform;
        [SerializeField] Transform curvePlatfomr;
        [SerializeField] Transform tShapePlatform;
        [SerializeField] Transform crossPlatform;

        Dictionary<PipeForm,Transform> pipePlatforms = new Dictionary<PipeForm,Transform>();

        [Header("Prefabs")]
        [SerializeField] GameObject straight;
        [SerializeField] GameObject curve;
        [SerializeField] GameObject t_Shape;
        [SerializeField] GameObject cross;
        Dictionary<PipeForm,GameObject> pipePrefabs = new Dictionary<PipeForm,GameObject>();

        //[SerializeField]
        //Vector2 pipePosOffset = new Vector2(-75, 0); //파이프 위치 오프셋

        private void Start()
        {
            pipeCountTexts.Add(PipeForm.Straight, straightPipeText);
            pipeCountTexts.Add(PipeForm.Curve, curvePipeText);
            pipeCountTexts.Add(PipeForm.T_Shape, tShapePIpeText);
            pipeCountTexts.Add(PipeForm.Cross, crossPipeText);

            pipePlatforms.Add(PipeForm.Straight, straightPlatform);
            pipePlatforms.Add(PipeForm.Curve, curvePlatfomr);
            pipePlatforms.Add(PipeForm.T_Shape, tShapePlatform);
            pipePlatforms.Add(PipeForm.Cross, crossPlatform);

            pipePrefabs.Add(PipeForm.Straight, straight);
            pipePrefabs.Add(PipeForm.Curve, curve);
            pipePrefabs.Add(PipeForm.T_Shape, t_Shape);
            pipePrefabs.Add(PipeForm.Cross, cross);
        }

        public void Init(Dictionary<PipeForm, int> remainPipe)
        {
            for(int i = 0; i < remainPipe.Count; i++)
            {
                pipeCountTexts[(PipeForm)i].text =  "x" + remainPipe[PipeForm.Straight];
            }

            for(int i = 0; i < pipePlatforms.Count; i++)
            {
                RectTransform newPipeRect = Instantiate(pipePrefabs[(PipeForm)i], pipePlatforms[(PipeForm)i]).GetComponent<RectTransform>();
                //newPipeRect.anchoredPosition = pipePosOffset;

                Pipe currentPipe = newPipeRect.GetComponent<Pipe>();
                currentPipe.InitPipe((PipeForm)i); //파이프 필드 초기화
            }
        }

        public void PipeSucsessedPlace(PipeForm form, int remainCount)
        {
            pipeCountTexts[form].text = "x" + remainCount;

            RectTransform newPipeRect = Instantiate(pipePrefabs[form] , pipePlatforms[form]).GetComponent<RectTransform>();
            //newPipeRect .anchoredPosition = pipePosOffset;

            Pipe currentPipe = newPipeRect.GetComponent<Pipe>();
            currentPipe.InitPipe(form); //파이프 필드 초기화
        }
    }
}
다음은 Block에서 관련된 처리를 해주면 된다. 해준 처리는 다음과 같다.
1. Pipe 클래스에 originParent 관련 Getter와 Setter를 추가
public Transform GetOriginParent()
{
	  return originParent;
}
public Vector2 GetOriginAnchoredPos()
{
    return originAnchoredPos;
}
2. Block의 OnDrop 수정 (Pipe의 oringParent으로 이전 블록이 있는지 판단)
public void OnDrop(PointerEventData eventData)
{
    if (state != BlockState.Empty) return; //파이프는 비어있는 블록에만 배치 가능

    Debug.Log($"OnDrop :: {gameObject.name}");

    if (eventData.pointerDrag != null)
    {
        Pipe droppedPipe = eventData.pointerDrag.GetComponent<Pipe>();
        if (droppedPipe == null) return;
        if (!droppedPipe.CanDrag()) return;

        //새로 배치할 경우 이전의 블록에서 pipe를 제거
        Block oldBlock = droppedPipe.GetOriginParent().GetComponent<Block>();
        if(oldBlock != null && oldBlock != this)
        {
            oldBlock.RemovePipe();
        }
        SetPipe(droppedPipe);
    }
}

public void RemovePipe()
{
		//기존에는 position의 값으로 출력했었음
    Debug.Log($"RemovePipe(Block : {gameObject.name})");
    if (pipe != null)
    {
        pipe = null;
        SetState(BlockState.Empty);
    }
}
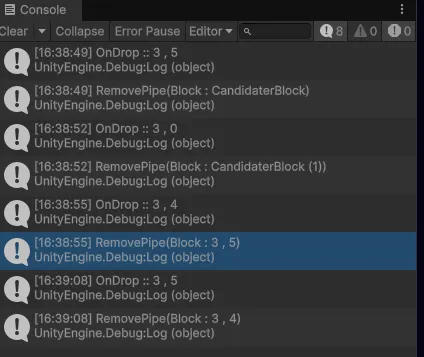
이제 블록이 파이프의 현재 부모가 아닌, originParent를 통해 판단을 내리니 이전에 가지고 있던 오류를 해결할 수 있게 되었을 것이다. 그리고 실제로 테스트를 해본 결과...
파이프 제거
이제 마지막으로 배치되어 있는 파이프를 선택하고 Remove 버튼을 눌러서 선택된 파이프가 배치되어 있는 블록에서 제거되는 기능을 구현만 하면 끝날 것이다.
InputController.cs
//배치되어 있던 파이프를 제거
public void RemoveSelectPipe()
{
    if (curSelectPipe != null)
    {
        //파이프 제거 로직

        //제거 후 현재 선택한 파이프를 비우기
        curSelectPipe = null;
    }
}
이미 InputController에 RemoveSelectPipe 함수를 만들었었다.
이 함수의 구현부를 채우기만 하면 될 것이다.
현재 선택한 파이프를 Destroy를 할 것인데, 그 전에 처리할 사항들이 많이 있다.
우선, 파이프가 배치되어 있는 블록을 지우고, 파이프의 남은 갯수도 돌아와야할 것이다.
코드로 구현하면 다음과 같다.
//배치되어 있던 파이프를 제거
public void RemoveSelectPipe()
{
    if (curSelectPipe != null)
    {
        //파이프 제거 로직
        Pipe curPipe = curSelectPipe.GetComponent<Pipe>();
        Block curSelectBlock = curPipe.transform.parent.GetComponent<Block>();

        Debug.Log($"RemoveSelectPipe, Block : {curSelectBlock.gameObject.name}");

        if (curSelectBlock.GetPipe() != null)
        {
            curSelectBlock.RemovePipe(); //블록 비우기 처리
            puzzleController.SetPipeCount(curPipe.GetForm(), puzzleController.GetPipeCount(curPipe.GetForm()) + 1); //개수 처리
            Destroy(curSelectPipe);      //파이프 지우기 처리
        }
        //제거 후 현재 선택한 파이프를 비우기
        curSelectPipe = null;
    }
}
이미 만들어둔 함수들을 다 가져와서 호출만 하면 된다. 이제 이 RemoveSelectPipe 함수는 Remove 버튼에 연결한다.
PuzzleController.cs
public void SetPipeCount(PipeForm form, int value)
{
    remainPipe[form] = value;
    pipeCandidater.SetPipeText(form, remainPipe[form]);
}
파이프의 개수가 변경되면 자동으로 텍스트에 변경사항을 반영하도록 추가한다.
PipeCandidater.cs
public void PipeSucsessedPlace(PipeForm form, int remainCount)
{
    SetPipeText(form, remainCount);
    RectTransform newPipeRect = Instantiate(pipePrefabs[form] , pipePlatforms[form]).GetComponent<RectTransform>();
    Pipe currentPipe = newPipeRect.GetComponent<Pipe>();
    currentPipe.InitPipe(form); //파이프 필드 초기화
}

public void SetPipeText(PipeForm form, int remainCount)
{
    pipeCountTexts[form].text = "x" + remainCount;
}
PipeSucsessedPlace 함수에 똑같은 코드가 있었다. 그런데 PuzzleController가 호출하기 위해 새로 함수를 만들었으니, 중복되는 코드는 함수로 처리하도록 만들었다.
테스트
드래그 드롭 버그도 고쳐서 잘 작동되고, 정해진 갯수를 다 쓰면 드래그가 막히는 것도 잘 작동되고, 배치된 파이프를 제거하는 Remove 함수도 잘 호출되고 있다.
그리고, 이 모든 상황이 합쳐진 갯수를 다 쓴 상태에서 Remove로 갯수가 늘어나면 드래그가 가능해지는 것도 확인할 수 있었다.
'Game Develop > 소규모 프로젝트' 카테고리의 다른 글
| "하루만에 퍼즐 게임 만들기" 챌린지 (5일차) : 카드 뒤집기(상) (0) | 2025.12.10 |
|---|---|
| "하루만에 퍼즐 게임 만들기" 챌린지 (4일차) : 파이프 연결 (Connect Pipe) - 에디터 만들기 [외전] (0) | 2025.12.01 |
| "하루만에 퍼즐 게임 만들기" (4일차) : 파이프 연결 (Connect Pipe) [중] (0) | 2025.11.23 |
| "하루만에 퍼즐 게임 만들기" 챌린지 (4일차) : 파이프 연결 (Connect Pipe) [상] (1) | 2025.11.17 |
| "하루만에 퍼즐 게임 만들기" 챌린지 (3일차) : 숫자 합치기 (2048) (1) | 2025.11.07 |