
들어가며
게임을 완성한 것은 이미 다 완성을 했지만, 오래 걸리지 않았다면 그날 바로 에디터를 만드는 것까지가 최초 계획이었었다.
지금 만드는 내용은 약 일주일 정도가 지난 이후에 다시 시간이 났을 때 만든 것이라 조금은 달라졌을 수도 있고, 아닐 수도 있다...
일단, 에디터를 만드는 이유는 파이프 연결 퍼즐은 다른 퍼즐 게임들과 달리 랜덤으로 스테이지 요소를 구성하기에는 퍼즐이 해결 가능한 상태인지 확인하기 어려운 경우가 많고, 랜덤으로 돌려서 알고리즘으로 랜덤으로 생성된 해당 스테이지가 해결 가능한지 판단하기에는 어려웠다.
그러니, 차라리 스테이지 에디터를 만들어서 각 스테이지의 데이터를 직접 구성하는 식으로 개발 계획을 만들었고, 실제 개발 단계에서도 이러한 생각이 코드에 녹아있었다. 모든 건 이후에 스테이지 데이터를 받아 처리하는 것을 전제로 코드를 짜두고 있었다는 뜻이다.
그렇다면 스테이지 에디터를 만들기 전에, 어떤 기능을 추가할 것이고 어떤 데이터가 필요한지 생각을 해보았다.
에디터에서 다룰 기능
먼저 지금 만든 게임의 구조로 미루어 봤을 때, 스테이지마다 가지고 있을 스테이지 데이터에서는 시작점과 도착점의 위치를 포함한 스테이지에 있는 블록들의 정보가 필요하다. 또한, 스테이지마다 지급될 파이프의 종류 별로 개수도 필요하다.
- 스테이지의 블록 데이터
- 스테이지의 파이프 지급 데이터
이를 바탕으로 스테이지 데이터를 만들어 보았다.
using ConnectPipe;
using UnityEngine;

[System.Serializable]
public struct PipeInfo
{
    public PipeForm form;
    public int pipeCount;
}

[CreateAssetMenu(fileName = "ConnectPipeStageData",menuName = "Custom/ConnectPipeStageData/ConnectPipe")]
public class ConnectPipeStageData : ScriptableObject
{
    public int width;
    public int height;
    public BlockState[,] blockStates;
    public BlockState[] serializedBlockStates; //2차원 배열은 유니티가 직렬화 지원을 안해서 1차원 배열로 저장했다가 다시 2차원 배열로 변환해서 사용
    public PipeInfo[] availablePipes;
}
스테이지 데이터는 스크립터블오브젝트를 통해 구현을 했다.
스테이지가 가지고 있어야할 정보인 열과 행을 각각 width와 height로 가지고 있고, 블록들의 상태를 가지고 있는 2차원 배열인 blockStates와 이를 직렬화하여 인스펙터창에 보여줄 serializeBlockStates도 있다.
파이프 지급 정보는 구조체를 만들어서 담아주었다.
스테이지 에디터 클래스 만들기
이 스테이지 데이터의 인스펙터창을 꾸미는 클래스를 만들 것이다.
그럴려면 이 클래스는 기존의 Monobehavior가 아닌 Editor라는 클래스를 상속받아야 한다. 또한 그냥 상속받으면 에러가 나니, usnig UnityEditor를 사용해줘야 한다.
StageEditor 코드는 다음과 같다.
using UnityEditor;
using UnityEngine;
using ConnectPipe;

[CustomEditor(typeof(ConnectPipeStageData))]
public class StageEditor : Editor
{
    private ConnectPipeStageData stageData;
    private int selectedBlockStateIndex = 0;
    private string[] blockStateNames;

    private void OnEnable()
    {
        stageData = (ConnectPipeStageData)target; //target는 Editor가 편집하고 있는 오브젝트를 가리킴
        blockStateNames = System.Enum.GetNames(typeof(BlockState)); //BlockState 열거형의 이름들을 문자열 배열로 가져옴

        if(stageData.serializedBlockStates == null ||
            stageData.serializedBlockStates.Length != stageData.width * stageData.height)
        {
            stageData.serializedBlockStates = new BlockState[stageData.width * stageData.height];
        }
    }

    //인스펙터가 그려질 때마다 호출됨
    public override void OnInspectorGUI()
    {
        serializedObject.Update();
				//이곳에 인스펙터의 내용들을 채우기
        serializedObject.ApplyModifiedProperties();
    }
}
위 코드는 초기에 틀만 잡아놓은 StageEditor 클래스이다. 각 요소들을 설명 및 정리하면 다음과 같다.
[CustomEditor(typeof(ConnectPipeStageData))] 는 속성(Attribute)이다. 의미는 이 클래스가 ConnectPipeStageData 타입의 인스펙터를 커터마이즈를 한다는 의미를 가지고 있다. 따라서 우리가 만들어놓은 스크립터블 오브젝트를 클릭하였을 때, 인스펙터 창에 우리가 지금 만드는 코드에 따라서 GUI가 달라진다는 뜻이다.
또한 OnInspectorGUI 메서드는 인스펙터가 그려질 때마다 호출되는 Editor 클래스에 있는 함수이다.
serializedObejct.Update 메서드와 ApplyModifiedProperties 메서드는 짝을 이루는 메서드로 각각 target(선택된 스크립터블 오브젝트)의 값을 불러와서 인스펙터에 최신 값을 반영하는 함수와 변경된 값을 저장하는 함수이다.
Update가 최신 값을 불러오는 메서드이며, ApplyModifiedProperties가 함수는 현재 인스펙터의 값을 반영하여 저장하는 함수이다.
OnInspectorGUI 메서드
이제 실제로 인스펙터 창에 띄울 GUI들을 직접 제어를 해볼 것이다. 위에서 만들어둔 OnInspectorGUI 메서드 안에 코드들을 쓰면 되는데, 이때 사용되는 클래스들은 EditorGUILayout 클래스의 함수들을 활용하면 된다.
사용 방법에 대해서 사족을 달자면, 과거 유니티가 지금의 UI 시스템을 갖기 전에 사용했던 UGUI인가를 사용했었고, 잠깐 접해본 적이 있었는 데 사용 방법이 거의 동일하였다.
StageEditor.cs
 public override void OnInspectorGUI()
 {
     serializedObject.Update();
     EditorGUILayout.LabelField("Puzzle Grid 설정", EditorStyles.boldLabel);
     stageData.width = EditorGUILayout.IntField("행", stageData.width);
     stageData.height = EditorGUILayout.IntField("열", stageData.height);
     serializedObject.ApplyModifiedProperties();
 }
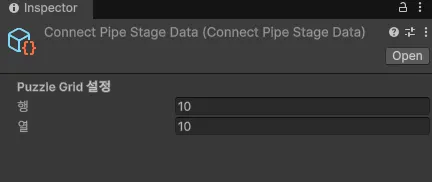
위 코드를 적으면 이제 스테이지 데이터의 인스펙터 창이 행과 열을 출력할 것이다.
버튼 Grid 그리기
이제는 버튼을 그려서 게임에서 보이는 것처럼 블록들의 상태를 확인할 수 있고 눌러서 상태를 변경할 수 있게끔 10*10의 버튼 Grid를 만들어보도록 하겠다.
코드는 다음과 같이 작성했다.
StageEditor.cs
using UnityEditor;
using UnityEngine;
using ConnectPipe;

[CustomEditor(typeof(ConnectPipeStageData))]
public class StageEditor : Editor
{
    private ConnectPipeStageData stageData;
    private int selectedBlockStateIndex = 0;
    private string[] blockStateNames;

    private void OnEnable()
    {
        stageData = (ConnectPipeStageData)target; //target는 Editor가 편집하고 있는 오브젝트를 가리킴
        blockStateNames = System.Enum.GetNames(typeof(BlockState)); //BlockState 열거형의 이름들을 문자열 배열로 가져옴

        if(stageData.serializedBlockStates == null ||
            stageData.serializedBlockStates.Length != stageData.width * stageData.height)
        {
            stageData.serializedBlockStates = new BlockState[stageData.width * stageData.height];
        }
    }

    //인스펙터가 그려질 때마다 호출됨
    public override void OnInspectorGUI()
    {
        serializedObject.Update();
        EditorGUILayout.LabelField("Puzzle Grid 설정", EditorStyles.boldLabel);
        stageData.width = EditorGUILayout.IntField("행", stageData.width);
        stageData.height = EditorGUILayout.IntField("열", stageData.height);

        EditorGUILayout.Space(10); //간격 추가

        //스테이지 구성
        EditorGUILayout.LabelField("스테이지 구성", EditorStyles.boldLabel);
        DrawGird();

        serializedObject.ApplyModifiedProperties();
    }

    private void DrawGird()
    {
        //버튼 스타일 설정
        GUIStyle buttonStyle = new GUIStyle(GUI.skin.button);
        buttonStyle.fixedWidth = 35;
        buttonStyle.fixedHeight = 35;
        buttonStyle.fontSize = 10;

        for(int y = 0; y < stageData.height; y++)
        {
            EditorGUILayout.BeginHorizontal(); //버튼 열의 가로 시작점 설정

            for (int x = 0; x < stageData.width; x++)
            {
                int index = y * stageData.width + x;
                BlockState state = stageData.serializedBlockStates[index];

                //버튼 색상
                Color originalColor = GUI.backgroundColor;
                GUI.backgroundColor = state switch //최-신 스위치문 사용해보기
                {
                    BlockState.Empty => Color.white,
                    BlockState.Fill => Color.cyan,
                    BlockState.Obstacle => Color.black,
                    BlockState.Firm => Color.black,
                    BlockState.Start => Color.blue,
                    BlockState.End => Color.red,
                    _ => Color.white,//디폴트
                };

                if(GUILayout.Button((""), buttonStyle)) //그리드의 버튼을 클릭하면,
                {
                    SetBlockState(index, (BlockState)selectedBlockStateIndex); //선택하고 있는 블록의 상태로 변경
                }
                GUI.backgroundColor = originalColor; //원래 색상으로 복원
            }
            EditorGUILayout.EndHorizontal(); //버튼 열의 가로 끝 설정
        }
    }

    //선택된 블록의 상태로 변경하는 메소드
    private void SetBlockState(int index, BlockState newState)
    {
        stageData.serializedBlockStates[index] = newState;
    }
}
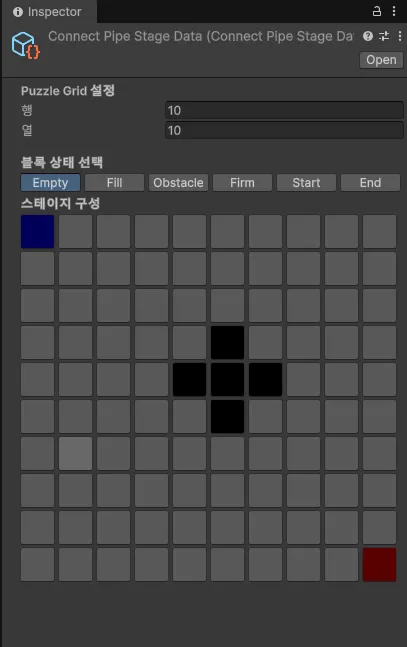
위 코드를 작성하면 아래 사진과 같이 인스펙터 창에 버튼들이 나타날 것이다. 나는 이미 데이터가 있어서 일부 블록들의 상태가 변경된 상태이지만, 기본 상태는 모든 블록의 상태가 Empty로 버튼의 색이 회색으로 나타나야 정상이다.

블록 상태 선택 버튼 만들기
지금까지 만든 대로 봤을 때, 어떤 블록을 선택하면 그 블록의 상태를 변경할 수 있다. 하지만, 어떤 상태로 변경할지 선택은 못하고 있으니, 그거에 대한 기능을 구현하도록 하겠다.
코드는 다음과 같다.
StageEditor.cs
    public override void OnInspectorGUI()
    {
        serializedObject.Update();
        EditorGUILayout.LabelField("Puzzle Grid 설정", EditorStyles.boldLabel);
        stageData.width = EditorGUILayout.IntField("행", stageData.width);
        stageData.height = EditorGUILayout.IntField("열", stageData.height);

        EditorGUILayout.Space(10); //간격 추가

        EditorGUILayout.LabelField("블록 상태 선택", EditorStyles.boldLabel);
        selectedBlockStateIndex = GUILayout.SelectionGrid(
            selectedBlockStateIndex,//현재 선택된 인덱스
            blockStateNames,        //버튼에 표시될 이름들
            blockStateNames.Length  //한 행의 길이
            );

        //스테이지 구성
        EditorGUILayout.LabelField("스테이지 구성", EditorStyles.boldLabel);
        DrawGird();

        serializedObject.ApplyModifiedProperties();
    }
GUI 관련 함수들은 꽤나 직관적이라, 한 번씩 써보면 어떤 함수인지 느낌이 올 것이다.
일단 SelectionGrid 함수를 통해 현재 선택된 블록 상태를 인덱스(selectedBlockStateIndex)로 반영하여 저장한다.
이제 블록 상태 버튼을 누르고, 아까 만들었던 버튼 Gird의 버튼을 선택하면 내가 선택했던 상태로 해당 버튼의 위치에 있는 블록의 상태가 변할 것이다.

파이프 지급 설정하기
이제 스테이지의 블록 상태들을 정의하는 GUI들을 만들었으니, 스테이지가 시작될 때 파이프가 어떤 종류가 몇 개가 지급될 것인지 정하는 GUI를 만들도록 하겠다.
코드는 다음과 같다.
StageEditor.cs
    public override void OnInspectorGUI()
    {
        serializedObject.Update();
        EditorGUILayout.LabelField("Puzzle Grid 설정", EditorStyles.boldLabel);
        stageData.width = EditorGUILayout.IntField("행", stageData.width);
        stageData.height = EditorGUILayout.IntField("열", stageData.height);

        EditorGUILayout.Space(10); //간격 추가

        EditorGUILayout.LabelField("블록 상태 선택", EditorStyles.boldLabel);
        selectedBlockStateIndex = GUILayout.SelectionGrid(
            selectedBlockStateIndex,//현재 선택된 인덱스
            blockStateNames,        //버튼에 표시될 이름들
            blockStateNames.Length  //한 행의 길이
            );

        //스테이지 구성
        EditorGUILayout.LabelField("스테이지 구성", EditorStyles.boldLabel);
        DrawGird();

        EditorGUILayout.Space(20); //간격 추가

        EditorGUILayout.LabelField("스테이지 파이프 지급 설정", EditorStyles.boldLabel);
        SerializedProperty pipesProperty //target에서 해당 데이터(프로퍼티) 가져오기
	         = serializedObject.FindProperty(
		         "availablePipes");
        if(pipesProperty != null)
        {
            EditorGUILayout.PropertyField(pipesProperty, true); //true는 하위 속성들도 함께 그리라는 의미
        }
        serializedObject.ApplyModifiedProperties();
        EditorUtility.SetDirty(stageData); //변경 사항 저장
    }
코드가 적용된 모습은 사진은 다음과 같다.

여기까지가 스테이지 에디터의 구현 부분이다. 이제부터는 스크립터블 오브젝트로 만들어진 이 스테이지 데이터로 스테이지를 생성하기 위해 기존에 만들었던 코드들을 수정하겠다.
스크립터블 오브젝트 데이터로 스테이지 생성하기
PuzzleGenerater.cs
using UnityEngine;

namespace ConnectPipe
{
    public class PuzzleGenerater : MonoBehaviour
    {
        [SerializeField]
        GameObject blockPrefab;

        [SerializeField]
        Transform blocksTrs;

        [SerializeField]
        GameObject pipe_Stragiht;
        [SerializeField]
        GameObject pipe_Cross;
        [SerializeField]
        GameObject pipe_Curve;
        [SerializeField]
        GameObject pipe_TShape;

        public Block[,] GenerateBlock(int rows, int cols)
        {
            Block[,] blocks = new Block[cols, rows];
            for (int y = 0; y < rows; y++)
            {
                for (int x = 0; x < cols; x++)
                {
                    GameObject newBlock = Instantiate(blockPrefab, blocksTrs);
                    newBlock.name = x + " , " + y;
                    Block block = newBlock.GetComponent<Block>();
                    block.InitBlock(BlockState.Empty, new Vector2Int(x, y));

                    blocks[x,y] = block;
                }
            }

            return blocks;
        }

        public Block[,] GenerateBlock(ConnectPipeStageData data, out Vector2Int startBlockPos)
        {
            startBlockPos = new Vector2Int(-1, -1);
            Block[,] blocks = new Block[data.width, data.height]; //데이터에 저장된 크기대로 블록 배열 생성
            for (int y = 0; y < data.height; y++)
            {
                for(int x = 0; x < data.width; x++)
                {
                    GameObject newBlock = Instantiate(blockPrefab, blocksTrs);
                    newBlock.name = x + " , " + y;
                    Block block = newBlock.GetComponent<Block>();
                    block.InitBlock(data.blockStates[x, y], new Vector2Int(x, y));//데이터에 저장된 블록의 상태를 가져와서 초기화 시키기
                    if (data.blockStates[x,y] == BlockState.Start)
                    {
                        startBlockPos = new Vector2Int(x, y);
                    }

                    blocks[x, y] = block;
                }
            }
            if(startBlockPos.x > data.width || startBlockPos.x < 0 ||
                startBlockPos.y > data.height || startBlockPos.y < 0)
            {
                Debug.LogError($"시작점이 잘못되었습니다. startBlockPos : {startBlockPos}");
            }
            return blocks;
        }

    }
}
우선 PuzzleGenerater 클래스에서는 기존의 GenerateBlock 함수를 오버로딩하여 ConnectPipeStageData(스크립터블 오브젝트로 만든 스테이지 데이터) 타입을 매개변수로 받는 함수를 새로 만들어주었다.
또한, 오버로딩하여 새로 만든 함수는 out 키워드를 사용하여 Vector2Int 타입의 반환값을 하나 더 받을 수 있게 만들었다. 이는 PuzzleController의 시작 블록인 startBlock을 초기화하기 위한 데이터로 활용하려고 만들었다.
PuzzleController.cs
[SerializeField]
private ConnectPipeStageData tempStageData; //임시로 에디터에서 만든 스테이지 데이터를 불러오기 위한 변수

public void GameStart()
{
  //blocks = generater.GenerateBlock(rows, cols);

  ////임시로 랜덤으로 시작점과 도착점 정하기
  //int startPosX = UnityEngine.Random.Range(0, cols);
  //int startPosY = UnityEngine.Random.Range(0, rows);
  //int endPosX = UnityEngine.Random.Range(0, cols);
  //int endPosY = UnityEngine.Random.Range(0, rows);
  ////랜덤으로 나와서 겹치는 경우가 있을 수도 있음
  ////어차피 계획으로는 레벨 에디터를 만들어서 레벨을 만들고, 그걸 스크립터블오브젝트든 뭐든 데이터로 스테이지로 만들 계획임

  //SelectStartEndBlock(new Vector2Int(startPosX,startPosY) , new Vector2Int(endPosX, endPosY));

    blocks = generater.GenerateBlock(tempStageData, out Vector2Int startBlockPos);
    startBlock = blocks[startBlockPos.x, startBlockPos.y];

    //파이프 지급
    InitPipeCount(5);
}
이제 PuzzleGenerater가 시작점과 도착점을 생성해서 던져주니, PuzzleController가 랜덤으로 뽑을 필요가 사라져서 해당 코드들을 주석으로 처리하였다.
그리고 스테이지 데이터를 받을 수 있는 변수를 새로 선언하고, PuzzleGenerater에 새로 오버로딩한 함수를 호출하도록 하였다.
스테이지 데이터에 따라서 파이프 지급
이제 블록 생성에 대해서 처리를 했으니, 파이프 지급에 대한 부분도 처리를 할 차례이다.
코드는 다음과 같다.
PuzzleController.cs
        public void GameStart()
        {
            blocks = generater.GenerateBlock(tempStageData, out Vector2Int startBlockPos);
            startBlock = blocks[startBlockPos.x, startBlockPos.y];

            //파이프 지급 처리
            //InitPipeCount(5); //기존 코드
            InitPipeCount(tempStageData);
            PipeCandidaterInit();
        }

        //모든 종류의 파이프를 동일한 개수로 초기화
        void InitPipeCount(int pipeCount)
        {
            for(int i = 0; i < Enum.GetNames(typeof(PipeForm)).Length; i++)
            {
                InitPipeCount((PipeForm)i, pipeCount);
            }
        }
        //스테이지 데이터에 맞게 파이프 개수 초기화
        void InitPipeCount(ConnectPipeStageData data)
        {
            for(int i = 0; i < data.availablePipes.Length; i++)
            {
                InitPipeCount(data.availablePipes[i].form, data.availablePipes[i].pipeCount);
            }
        }

        //특정 종류의 파이프 개수만 초기화
        void InitPipeCount(PipeForm form, int pipeCount)
        {
            if (remainPipe.ContainsKey(form))
            {
                remainPipe[form] = pipeCount;
            }
            else
            {
                remainPipe.Add(form, pipeCount);
            }
            //pipeCandidater.Init(remainPipe);
        }
        void PipeCandidaterInit()
        {
            pipeCandidater.Init(remainPipe);
        }
기존에 파이프를 지급하던 함수(InitPipeCount)는 모든 종류의 파이프를 동일한 개수로 초기화 시키는 함수만 있었으나, 이번에 기능을 분리하였다.
- 모든 종류의 파이프를 동일한 갯수로 초기화
- 스테이지 데이터에 맞게 파이프 개수를 초기화
- 특정 종류의 파이프 개수만 초기화
이 함수들은 어떤 함수를 호출하든 특정 종류의 파이프 개수를 초기화하는 함수로 귀결되게 구조를 만들어 중복을 최대한 제거했다.
하지만, 실제로 데이터를 전달하는 pipeCandidater.Init(remainPipe) 함수는 밖으로 빼내었는데, 왜냐하면 특정 종류의 파이프만 초기화하는 함수에 넣으면, 반복문에서 계속 호출될 테니 불필요하다고 판단하여 밖으로 빼내었다.

테스트 이후 버그 수정

테스트한 결과가 위 사진인데, 블록이 인스펙터와 반대로 나오게 되었다.
코드를 다시 찾아보니, StageEditor의 버튼 Gird가 위에서 아래로 그리기 때문인데, 실제 게임은 아래에서 위로 그리기 때문에 인스펙터와 반대로 출력된 것이다.
그러니, StageEditor의 Grid를 그리는 함수의 y를 역순으로 진행시키면 상하반전이 되어 게임에 나오는 블록과 동기화될 것이다.
StageEditor.cs
private void DrawGird()
{
    // 버튼 스타일 설정
    GUIStyle buttonStyle = new GUIStyle(GUI.skin.button);
    buttonStyle.fixedWidth = 35;
    buttonStyle.fixedHeight = 35;
    buttonStyle.fontSize = 10;

    for (int y = stageData.height - 1; y >= 0; y--) // y를 역순으로
    {
        EditorGUILayout.BeginHorizontal(); // 버튼 열의 가로 시작점 설정

        for (int x = 0; x < stageData.width; x++)
        {
            int index = y * stageData.width + x;
            BlockState state = stageData.serializedBlockStates[index];

            // 버튼 색상
            Color originalColor = GUI.backgroundColor;
            GUI.backgroundColor = state switch
            {
                BlockState.Empty => Color.white,
                BlockState.Fill => Color.cyan,
                BlockState.Obstacle => Color.black,
                BlockState.Firm => Color.black,
                BlockState.Start => Color.blue,
                BlockState.End => Color.red,
                _ => Color.white,
            };

            if (GUILayout.Button("", buttonStyle)) // 버튼 클릭 시
            {
                SetBlockState(index, (BlockState)selectedBlockStateIndex);
            }

            GUI.backgroundColor = originalColor; // 원래 색상 복원
        }

        EditorGUILayout.EndHorizontal(); // 버튼 열 끝
    }
}
추가적인 오류로 파이프 생성이 안 되는 버그가 있었다.
이 버그는 다 만들고 시간이 지나 글을 쓰는 지금도 원인을 못 찾고 있는 원인에 의해 발생했다. 아마 스테이지 에디터를 작업하고 나서부터 remainPipe의 키값에 관련한 문제가 일어나서 코드를 수정했다.
using System.Collections.Generic;
using Unity.VisualScripting;
using UnityEngine;
using UnityEngine.UI;
namespace ConnectPipe
{
    public class PipeCandidater : MonoBehaviour
    {
        [Header("Texts")]
        [SerializeField] Text straightPipeText;
        [SerializeField] Text curvePipeText;
        [SerializeField] Text tShapePIpeText;
        [SerializeField] Text crossPipeText;

        Dictionary<PipeForm,Text> pipeCountTexts = new Dictionary<PipeForm,Text>();

        [Header("Transforms")]
        [SerializeField] Transform straightPlatform;
        [SerializeField] Transform curvePlatform;
        [SerializeField] Transform tShapePlatform;
        [SerializeField] Transform crossPlatform;

        Dictionary<PipeForm,Transform> pipePlatforms = new Dictionary<PipeForm,Transform>();

        [Header("Prefabs")]
        [SerializeField] GameObject straight;
        [SerializeField] GameObject curve;
        [SerializeField] GameObject t_Shape;
        [SerializeField] GameObject cross;
        Dictionary<PipeForm,GameObject> pipePrefabs = new Dictionary<PipeForm,GameObject>();

        //private void Start()
        //{
        //    pipeCountTexts.Add(PipeForm.Straight, straightPipeText);
        //    pipeCountTexts.Add(PipeForm.Curve, curvePipeText);
        //    pipeCountTexts.Add(PipeForm.T_Shape, tShapePIpeText);
        //    pipeCountTexts.Add(PipeForm.Cross, crossPipeText);

        //    pipePlatforms.Add(PipeForm.Straight, straightPlatform);
        //    pipePlatforms.Add(PipeForm.Curve, curvePlatfomr);
        //    pipePlatforms.Add(PipeForm.T_Shape, tShapePlatform);
        //    pipePlatforms.Add(PipeForm.Cross, crossPlatform);

        //    pipePrefabs.Add(PipeForm.Straight, straight);
        //    pipePrefabs.Add(PipeForm.Curve, curve);
        //    pipePrefabs.Add(PipeForm.T_Shape, t_Shape);
        //    pipePrefabs.Add(PipeForm.Cross, cross);
        //}
        private void EnsureDictionariesInitialized()
        {
            if (!pipeCountTexts.ContainsKey(PipeForm.Straight))
                pipeCountTexts.Add(PipeForm.Straight, straightPipeText);
            if (!pipeCountTexts.ContainsKey(PipeForm.Curve))
                pipeCountTexts.Add(PipeForm.Curve, curvePipeText);
            if (!pipeCountTexts.ContainsKey(PipeForm.T_Shape))
                pipeCountTexts.Add(PipeForm.T_Shape, tShapePIpeText);
            if (!pipeCountTexts.ContainsKey(PipeForm.Cross))
                pipeCountTexts.Add(PipeForm.Cross, crossPipeText);

            if (!pipePlatforms.ContainsKey(PipeForm.Straight))
                pipePlatforms.Add(PipeForm.Straight, straightPlatform);
            if (!pipePlatforms.ContainsKey(PipeForm.Curve))
                pipePlatforms.Add(PipeForm.Curve, curvePlatform);
            if (!pipePlatforms.ContainsKey(PipeForm.T_Shape))
                pipePlatforms.Add(PipeForm.T_Shape, tShapePlatform);
            if (!pipePlatforms.ContainsKey(PipeForm.Cross))
                pipePlatforms.Add(PipeForm.Cross, crossPlatform);

            if (!pipePrefabs.ContainsKey(PipeForm.Straight))
                pipePrefabs.Add(PipeForm.Straight, straight);
            if (!pipePrefabs.ContainsKey(PipeForm.Curve))
                pipePrefabs.Add(PipeForm.Curve, curve);
            if (!pipePrefabs.ContainsKey(PipeForm.T_Shape))
                pipePrefabs.Add(PipeForm.T_Shape, t_Shape);
            if (!pipePrefabs.ContainsKey(PipeForm.Cross))
                pipePrefabs.Add(PipeForm.Cross, cross);
        }


        public void Init(Dictionary<PipeForm, int> remainPipe)
        {
            Debug.Log($"{GetType()}::Init");
            EnsureDictionariesInitialized();
            Debug.Log($"pipeCountTexts Count : {pipeCountTexts.Count}");
            Debug.Log($"pipePlatforms Count : {pipePlatforms.Count}");
            for (int i = 0; i < pipeCountTexts.Count; i++)
            {
                pipeCountTexts[(PipeForm)i].text =  "x" + remainPipe[(PipeForm)i];
                Debug.Log($"Set Pipe Count Text....{((PipeForm)i).GetType()}");
            }

            for(int i = 0; i < pipePlatforms.Count; i++)
            {
                RectTransform newPipeRect = Instantiate(pipePrefabs[(PipeForm)i], pipePlatforms[(PipeForm)i]).GetComponent<RectTransform>();

                Pipe currentPipe = newPipeRect.GetComponent<Pipe>();
                currentPipe.InitPipe((PipeForm)i); //파이프 필드 초기화
                Debug.Log($"Init Pipe....{((PipeForm)i).GetType()}");
            }
        }

        public void PipeSucsessedPlace(PipeForm form, int remainCount)
        {
            SetPipeText(form, remainCount);
            RectTransform newPipeRect = Instantiate(pipePrefabs[form] , pipePlatforms[form]).GetComponent<RectTransform>();
            Pipe currentPipe = newPipeRect.GetComponent<Pipe>();
            currentPipe.InitPipe(form); //파이프 필드 초기화
        }
        public void SetPipeText(PipeForm form, int remainCount)
        {
            pipeCountTexts[form].text = "x" + remainCount;
        }
    }
}
이렇게 하니, 마지막 사진에 나오는 파이프들처럼 잘 나왔다.
(파이프를 먼저 고치고, 인스펙터를 고쳤음. 하지만 이 버그는 아직도 원인을 모르니, 나중에 원인을 찾게 되면 와서 수정을 할까 봐 밑으로 내려둔 것)
여기까지 해서 파이프 연결 퍼즐 게임을 완료했다. 원래 핵심 기능들은 시간 안에 구현이 되어서 성공이라 하고 싶었지만, 그래도 챌린지 규칙은 규칙이라 고민 끝에 실패했다고 하기로 했다.
그다음에 스테이지 에디터를 일주일이 지난 다음에 작업을 하기도 했으니 성공이라고 보기에는 조금 양심에 찔렸던 것일 수도 있다고 본다.
그래도 지금까지 만든 것 중에 가장 어려웠다고 말할 수 있을 것 같다. 다음 게임은 카드 뒤집기(Flip Card)로 찾아오겠다.
'Game Develop > 소규모 프로젝트' 카테고리의 다른 글
| "하루만에 퍼즐 게임 만들기" 챌린지 (6일차) : 해밀토니안 경로 퍼즐 (1) | 2025.12.19 |
|---|---|
| "하루만에 퍼즐 게임 만들기" 챌린지 (5일차) : 카드 뒤집기(상) (0) | 2025.12.10 |
| "하루만에 퍼즐 게임 만들기" (4일차) : 파이프 연결 (Connect Pipe) [하] (0) | 2025.11.23 |
| "하루만에 퍼즐 게임 만들기" (4일차) : 파이프 연결 (Connect Pipe) [중] (0) | 2025.11.23 |
| "하루만에 퍼즐 게임 만들기" 챌린지 (4일차) : 파이프 연결 (Connect Pipe) [상] (1) | 2025.11.17 |